전글에서는 Tuist 설치 및 시행방법 그리고 기본적인 Tuist의 구조에 대해서 알아 보았다.
이번글부터는 본격적으로 어떻게 기존 프로젝트에 Tuist를 도입하는지에 대해 글을 써볼 것이다.
3.Tuist Edit
3-1. 현재 프로젝트에 맞게 Tuist 디렉토리 생성하기
본격적으로 Project.swift 파일과 Project+Templates.swift 파일을 추가, 수정 하며 우리가 원하는 프로젝트의 형태로 만들어나갈 것이다.
그전에 일단 불필요한 파일들을 지워서 다음과 같이 만들어놓자.
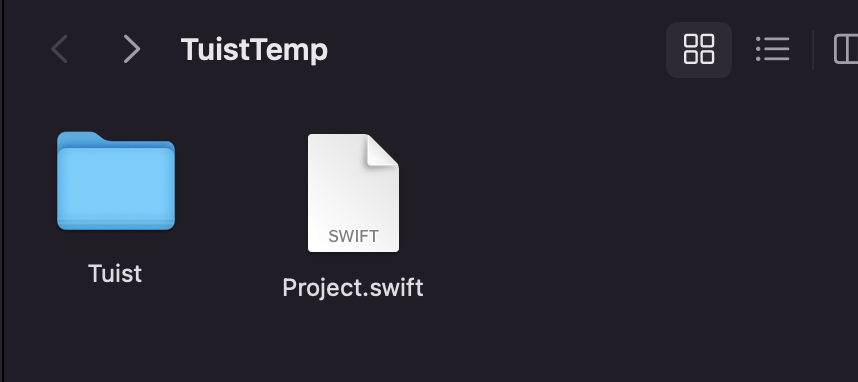
안에 있는 Config.swift와 Project+Template.swift은 파일을 냅두고 코드들만 싹다 지워놓으면 된다.
그리고 다시 우리가 원하는 최종 형태의 구성물을 확인해보자.

우리의 최종적인 형태는 app 5개와 framework 5개이다.
총 project가 10개가 되는 것이다. 물론 Demo와 framework를 하나의 프로젝트로 묶은 다음에 Target으로 분리할 수 도 있지만
필자는 그냥 서로 다른 프로젝트로 분리하였다.
|---Feature
|--- Sources(코드 파일들의 디렉토리)
|--- Resources(에셋, 폰트,storyBoard 등을 위한 디렉토리)
|--- 필요에 따라서 더 만들 수 있다.(ex DevSources)
그러면 위의 같은 구조가 최소 10개가 필요하다는 것이다. 이를 글에서는 편의상 TUnit이라 부르겠다.
그러면 무작정 코드로 들어가기 전에 디렉토리 구조를 어떻게 만들건지 생각해보자
필자는 다음과 같이 정의 하였다.
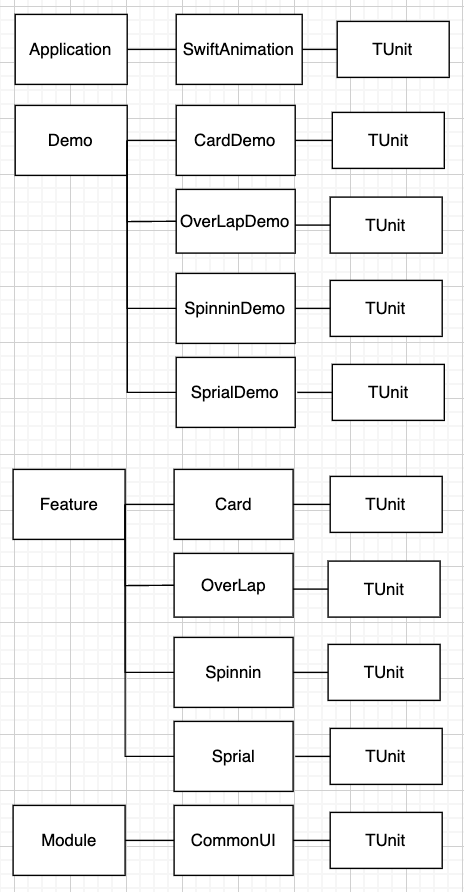
이제 어떻게 만들지 기본 뼈대가 완성되었다.
이제 아래 명령어를 사용하여 디렉토리 생성을 시작하자
tuist edit명령어를 실행하면 다음과 같은 화면의 xcode가 켜질 것이다.
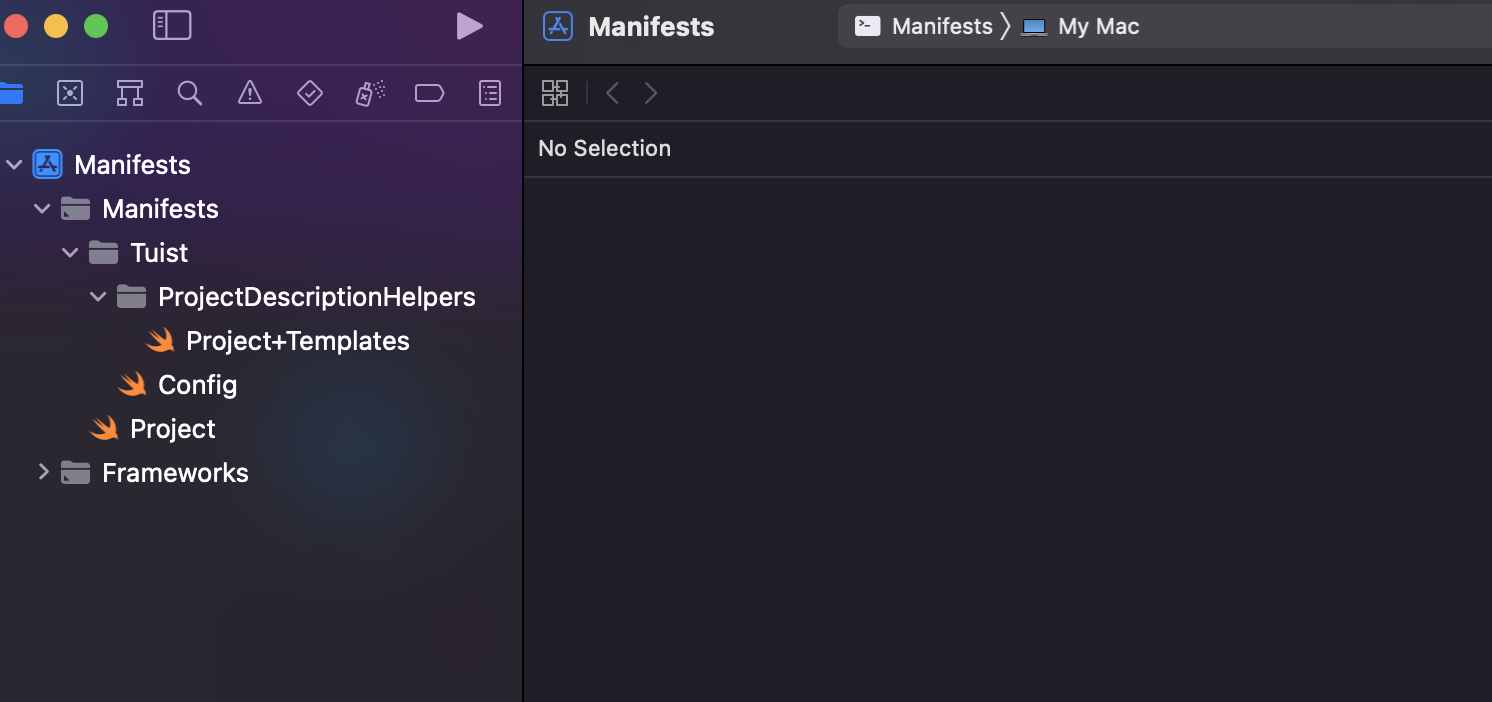
이제 위에 그렸던 디렉토리 구조와 같게 디렉토리를 생성한다.
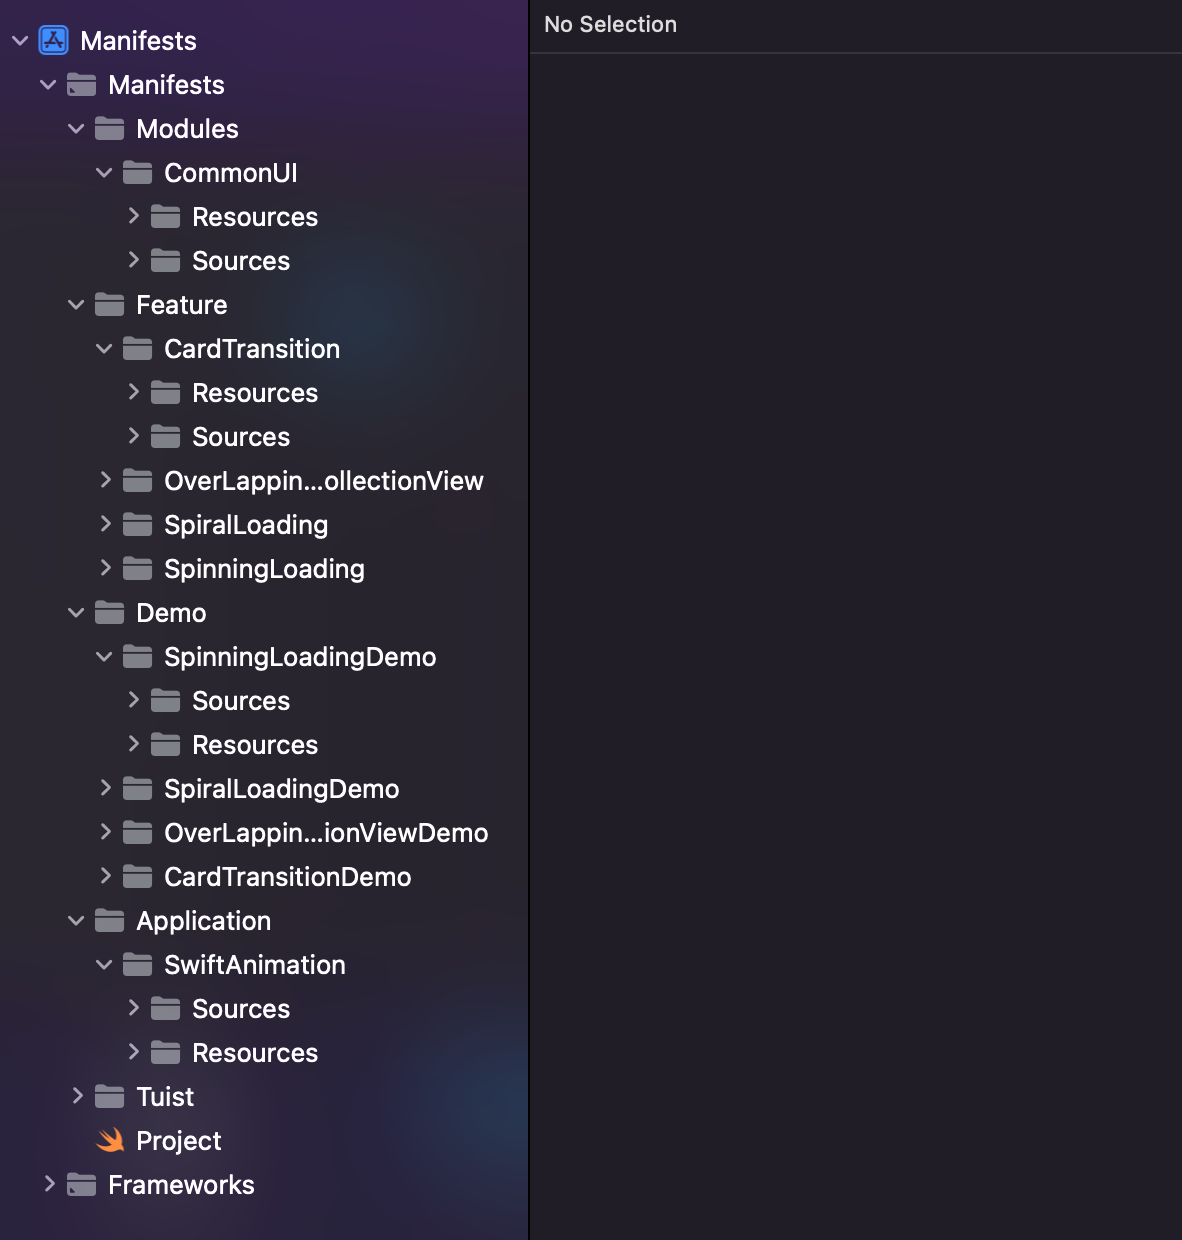
작업을 다하면 다음과 같은 상태가 될 것이다. 아직 끝이 아니다 기본 세팅을 위해서는 조금 남았다.
전글에서 Workspace와 Project에 관해서 간단한 설명을 했다.
우리는 프로젝트가 10개니 Workspace를 생성해야 한다.
그리고 각각의 프로젝트를 위한 10개의 Project.swift를 만들어야 한다.
일단 기존의 Project.swift 파일은 삭제한다.
그리고 Workspace.swift는 Mainfest디렉토리와 같은 레벨에 만들고
Project.swift는 각 TUnit과 동일한 레벨에 만들면 된다.
이때 Workpace.swift 과 Project.swift에 import ProjectDescription을 꼭해줘야 한다 아니면
종료 하고 다시 tuist edit 했을때 해당 파일 인지하지 못해서 프로젝트 네비게이터에 나오지 않는다.
아래와 같은 결과물이 만들어진다.
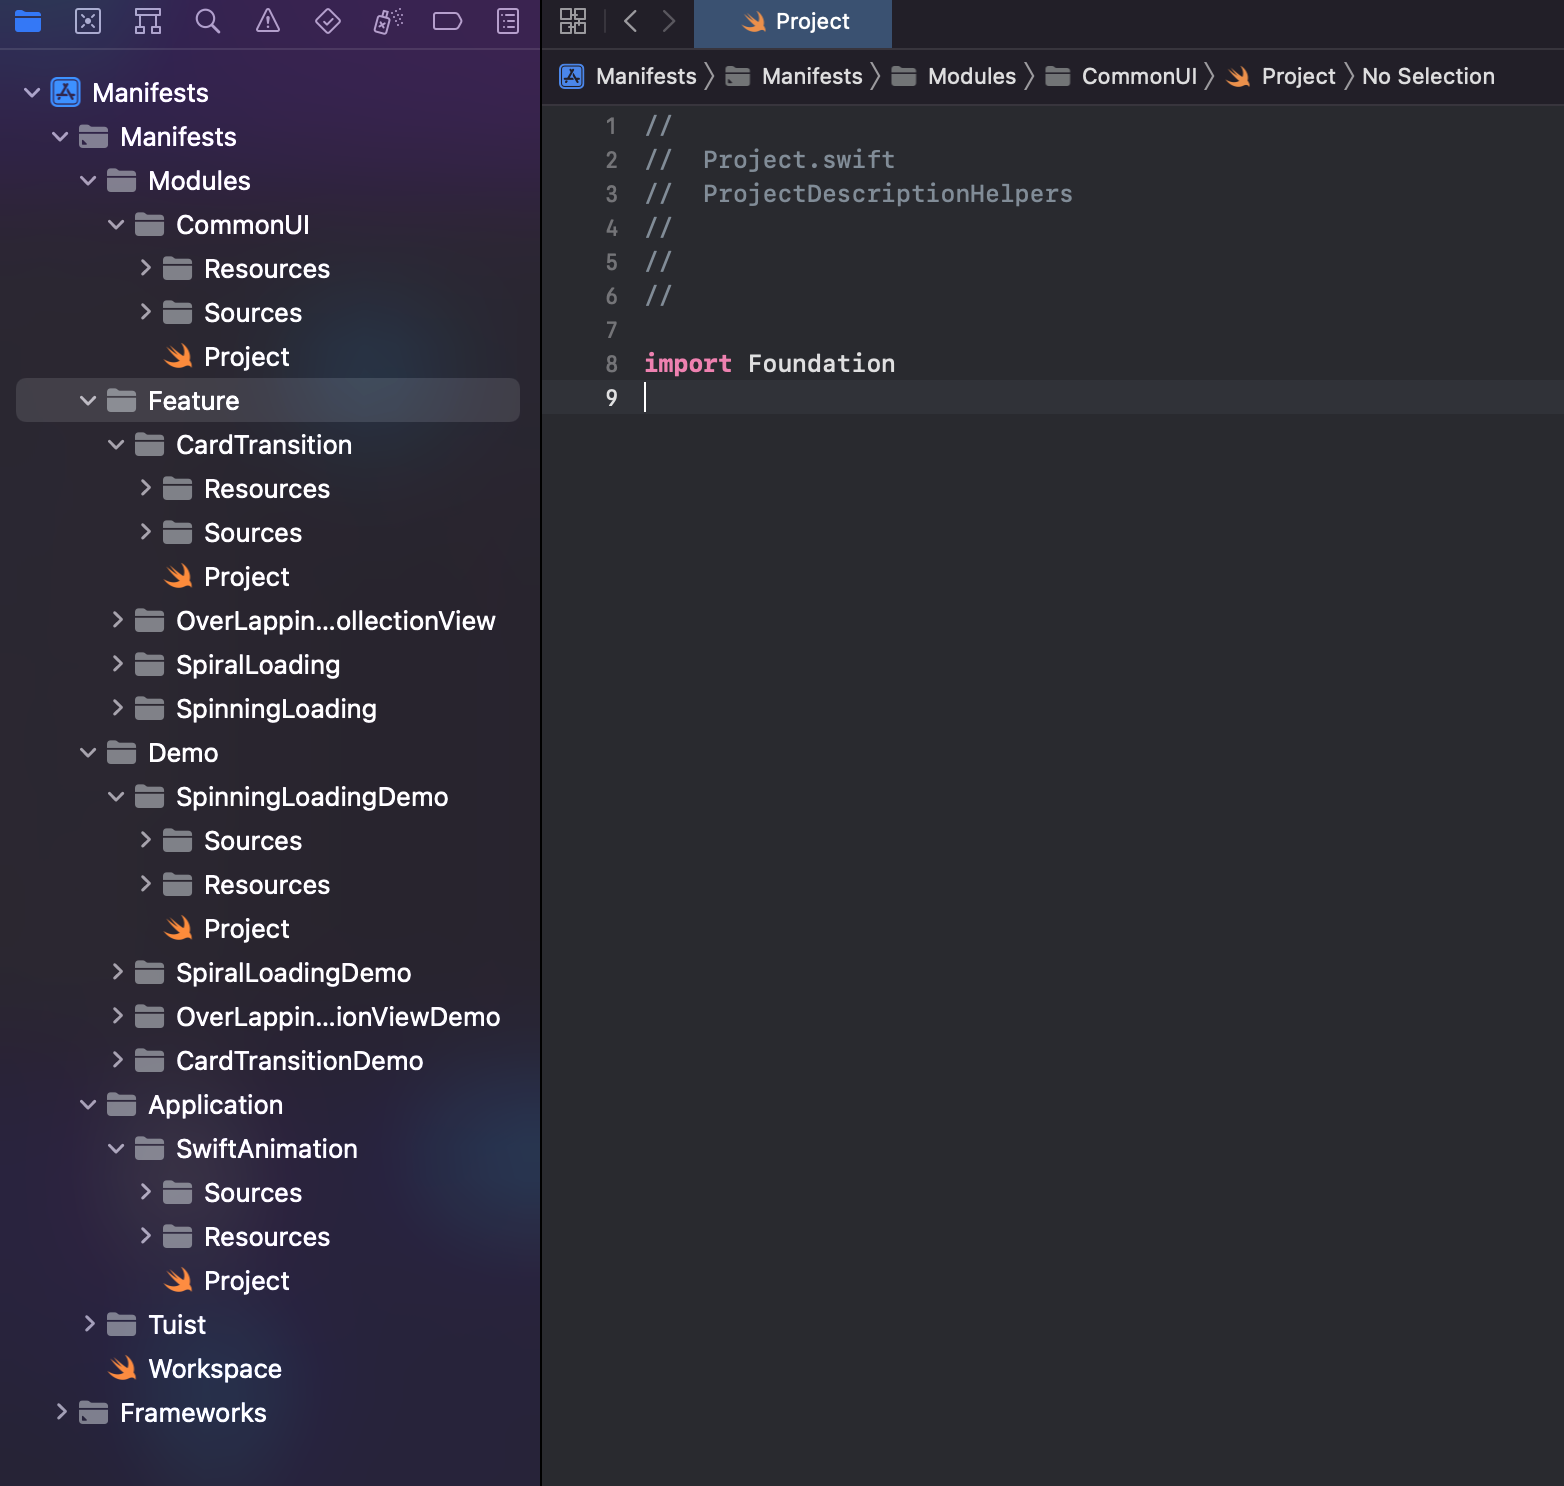
이제 터미널 창으로 이동 control + c를 눌러준다.
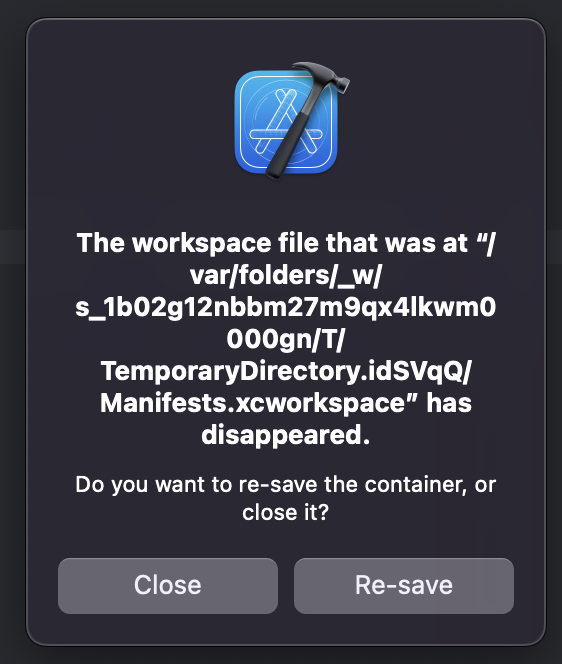
살짝 기다리면 xcode가 닫힘과 동시에 다음 팝업이 뜬다. 이때 close를 선택하면 된다.
다시 tuist edit을 실행해보면 다음과 같이 불필요한 디렉토리와 파일들은 날아간 채로 Project.swift와 Workspace.swift만 남아 있게 된다.
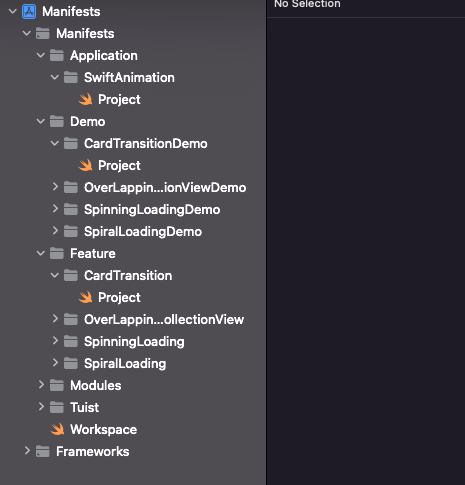
이제 본격적으로 코딩을 할 차례이다.
3-2. Project.swift , Workspace.swift 작성 및 기존 프로젝트 소스 가져오기
우선 Project+Templates.swift 파일을 키고 다음 코드를 복사 붙여 넣기 한다.
import ProjectDescription
import ProjectDescriptionHelpers

public extension Project {
    static func makeModule(
        name: String,
        organizationName: String = "HSMProducts",
        packages: [Package] = [],
        targets : [Target]
    ) -> Project {
        let settings: Settings = .settings(
            base: [:],
            configurations: [
                .debug(name: .debug),
                .release(name: .release)
            ], defaultSettings: .recommended)

        var schemeTargetName : String = name
        if let target = targets.first {
            schemeTargetName = target.name
        }
        var schemes : [Scheme] = [.makeScheme(target: .debug, name: schemeTargetName),
                                 .makeScheme(target: .release, name: schemeTargetName)]


        var targets: [Target] = targets

        return Project(
            name: name,
            organizationName: organizationName,
            packages: packages,
            settings: settings,
            targets: targets,
            schemes: schemes
        )
    }

    static func makeApp(
        name: String,
        platform: Platform = .iOS,
        organizationName: String = "HSMProducts",
        packages: [Package] = [],
        deploymentTarget: DeploymentTarget? = .iOS(targetVersion: "15.0", devices: [.iphone]),
        dependencies: [TargetDependency] = [],
        sources: SourceFilesList = ["Sources/**"],
        resources: ResourceFileElements? = nil,
        infoPlist: InfoPlist = .default
    ) -> Project {
        let settings: Settings = .settings(
            base: [:],
            configurations: [
                .debug(name: .debug),
                .release(name: .release)
            ], defaultSettings: .recommended)

        let appTarget = Target(
            name: name,
            platform: platform,
            product: .app,
            bundleId: "\(organizationName).\(name)",
            deploymentTarget: deploymentTarget,
            infoPlist: infoPlist,
            sources: sources,
            resources: resources,
            dependencies: dependencies
        )

        let schemes: [Scheme] = [.makeScheme(target: .debug, name: name),
                                 .makeScheme(target: .release, name: name)]

        let targets: [Target] = [appTarget]

        return Project(
            name: name,
            organizationName: organizationName,
            packages: packages,
            settings: settings,
            targets: targets,
            schemes: schemes
        )
    }

}

extension Scheme {
    static func makeScheme(target: ConfigurationName, name: String) -> Scheme {
        return Scheme(
            name: name,
            shared: true,
            buildAction: .buildAction(targets: ["\(name)"]),
            testAction: .targets(
                ["\(name)"],
                configuration: target,
                options: .options(coverage: true,
                                  codeCoverageTargets: ["\(name)"])
            ),
            runAction: .runAction(configuration: target),
            archiveAction: .archiveAction(configuration: target),
            profileAction: .profileAction(configuration: target),
            analyzeAction: .analyzeAction(configuration: target)
        )
    }

}
위의 코드에서 makeModule은 Feature와 Demo프로젝트에 만드는 데 쓰일것이고 makeApp은 최종 산출물이 swiftAnimation에 쓰인다.
그리고 나서 Feature/CardTransition에 있는 Project.swift 파일을 열고 다음과 같이 코드를 작성한다.
import ProjectDescription
import ProjectDescriptionHelpers


let deployTarget = Target(name: "CardTransition",
                          platform: .iOS,
                          product: .staticFramework,
                          bundleId: "com.app" + ".CardTransition",
                          deploymentTarget: .iOS(targetVersion: "15.0", devices: .iphone),
                          infoPlist: .extendingDefault(with: [:]),
                          sources: ["Sources/**"],
                          resources: nil,
                          dependencies: [
                            .project(target: "CommonUI",
                                     path: .relativeToRoot("Modules/CommonUI"))
                          ])

let project = Project.makeModule(name: "CardTransition",
                                 targets: [deployTarget])
Target을 보면 산출물의 형태는 frameWork이고, 소스 코드는 Features/CardTransition/Sources 휘하의 파일들을 참조한다.
그리고 CommonUI에 대한 의존도가 있음을 확인할 수 있다.
현재는 resources가 nil 이지만 CommonUI는 이미지 에셋을 위해 resources의 path를 설정해주어야 한다.
남은 Feature들과 Modules를 위와 같은 작업으로 쭉 해준다.
그리고 나서 Demo/CardTransition에 있는 Project.swift를 열어주고 다음 코드를 복사한다.
import ProjectDescription
import ProjectDescriptionHelpers


let demoTarget = Target(name: "CardTransitionDemo",
                        platform: .iOS,
                        product: .app,
                        bundleId: "com.app" + ".CardTransition.Demo",
                        deploymentTarget: .iOS(targetVersion: "15.0", devices: .iphone),
                        infoPlist: .extendingDefault(with: [:]),
                        sources: ["Sources/**"],
                        resources: nil,
                        dependencies: [
                            .project(target: "CardTransition", path: .relativeToRoot("Features/CardTransition")),
                            .project(target: "CommonUI",
                                     path: .relativeToRoot("Modules/CommonUI"))
                        ])


let project = Project.makeModule(name: "CardTransitionDemo",
                                 targets: [demoTarget])
Features와 다른 점은 Demo App 이기 때문에 product가 .app의 형태이고 Features/Cardtransition에 대해서 추가적으로 의존하고 있다.
남은 Demo들도 위와 같은 작업을 쭉 해준다.
이제 Application/SwiftAnimation/Project.swift 하나 남았다.
import ProjectDescription
import ProjectDescriptionHelpers

let APPDependency : [TargetDependency] = [
    .project(target: "SpinningLoading",
             path: .relativeToRoot("Features/SpinningLoading")),
    .project(target: "SpiralLoading",
             path: .relativeToRoot("Features/SpiralLoading")),
    .project(target: "CardTransition",
             path: .relativeToRoot("Features/CardTransition")),
    .project(target: "OverLappingCollectionView",
             path: .relativeToRoot("Features/OverLappingCollectionView"))
  ]


let project = Project.makeApp(name: "SwiftAnimation",
                              dependencies: APPDependency,
                              resources: ["Resources/**"],
                              infoPlist: .extendingDefault(with: [:]))
최종 산출물 형태는 Features를 frameWork로 포함하고 있는 형태이다. 따라서 위와 같이 dependencies를 설정해준다.
이렇게 하면 프로젝트를 위한 설정은 끝났다.
이제 이 프로젝트들을 하나로 묶어서 관리할 Workspace.swift 파일만 설정해주면 된다.
import ProjectDescription
import ProjectDescriptionHelpers
import Foundation


let workspace = Workspace(
    name: "SwiftAnimation",
    projects: [
        "Modules/CommonUI",
        "Features/**",
        "Application/SwiftAnimation",
        "Demo/**"]
        )
이제 Workspace작업 까지 끝이 났다.
이제 control + c를 눌러 종료한 후
tuist generate를 하여 프로젝트를 생성해본다.
다음과 같이 나오면 성공이다.
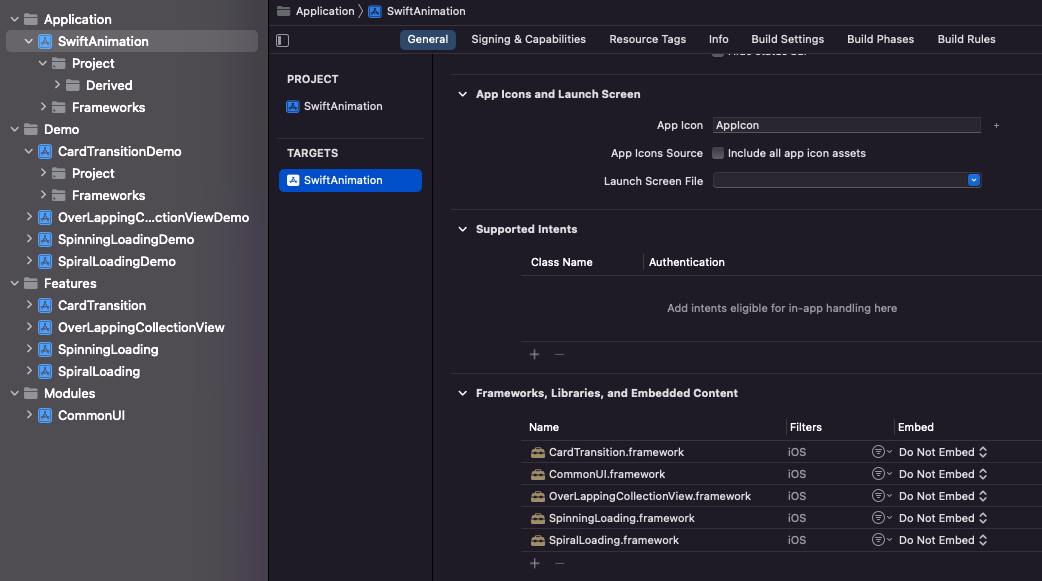
10개의 프로젝트가 생성되어 있고, 오른쪽 아래를 보면 의존성 관계도 정확히 잡혀 있는 것을 볼 수 있다.
하지만 Sources와 Resources 디렉토리가 보이지 않는다.
이는 아직 휘하에 파일들이 없기 때문이다. 이부분이 Tuist를 사용하면서 불편한 점 중 하나 인것 같다.
Hoxy나 이 글을 가지고 Tuist를 그대로 따라해보고 있는 분들을 위하여 해당 Tuist적용 전 프로젝트 깃헙 링크를 적어 놓는다.
https://github.com/sangriel/Swift_Animation
기존 프로젝트를 가지고 먼저 Features와 CommonUI 내용물을 채워넣는다. 이는 그냥 Finder에서 복붙하면 된다.
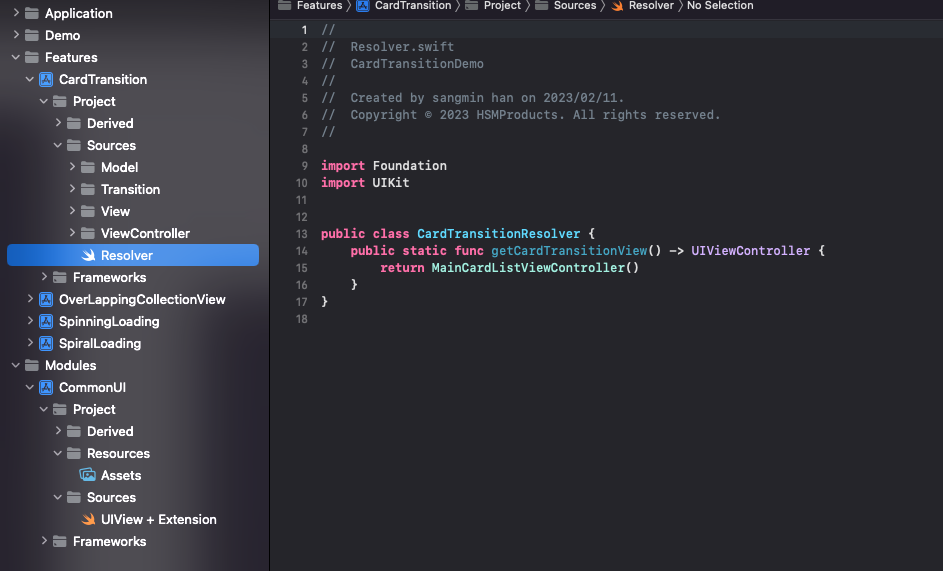
복붙을 다 했다면 위와 같은 상태가 되어 있을것이다. 아까와는 다르게 Sources와 Resources가 보인다.
여기서 Resolver는 굳이 ViewController들을 public상태로 두기 싫어서 만들어 둔 것이다.
UIView + Extension은 다음 내용이 들어가 있다.
import UIKit

public extension UIView {

    public func createSnapshot(withFrame : CGRect?,size : CGSize?) -> UIImage? {
        if let size = size {
            UIGraphicsBeginImageContextWithOptions(size, false, 0)
        }
        else {
            UIGraphicsBeginImageContextWithOptions(frame.size, false, 0)
        }
        if let selectedFrame = withFrame {
            drawHierarchy(in: selectedFrame, afterScreenUpdates: true)
        }
        else {

            drawHierarchy(in: frame, afterScreenUpdates: true)
        }

        let image = UIGraphicsGetImageFromCurrentImageContext()
        UIGraphicsEndImageContext()
        return image
    }

}
여기까지 했다면 이제 Features와 Module들은 다 만들어 졌다.
이제 DemoApp들을 작성할 것이다.
DemoApp들은 더 별거 없다. Sources 아래에 AppDelegate와 SceneDelegate만 만들어 주면 된다.
다 추가해 놓고 다시 generate를 하면 다음과 같이 된다.
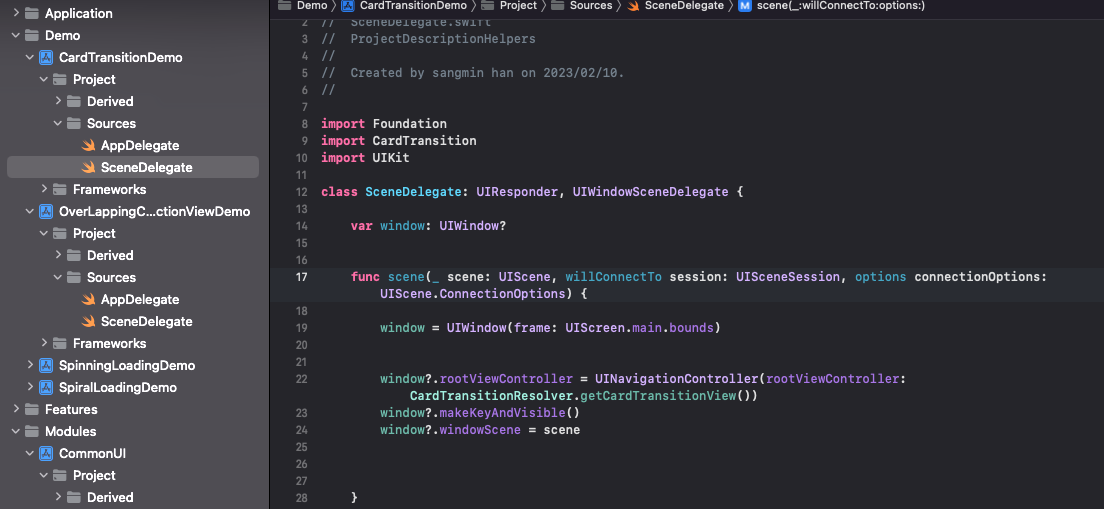
DemoApp은 지금 상태에서는 그냥 Features에서 작성한 것들을 화면에 뿌려주기만 하면 된다.
이제 DemoApp이 완성되었으니 cmd + r을 눌러 시뮬레이터로 실행해보자.
실행해 보았는가? 아마 거무튀튀한 화면만 나올 것이다.
이유는 SceneDelegate와 AppDelegate를 작성해 놓았음에도 infoPlist가 이에 맞게 설정 되어있지 않아 그런것이다.
xcode를 끄고 다시 tuist edit을 해준다.
그리고 다음 코드를 Project+Templates.swift에 추가하고
Demo,SwiftAnimations에 있는 infoPlist를 다음과 같이 바꿔준다.
//Project+Templates.swift
public extension InfoPlist {
    static  func sceneDefault(with : [String : Value]) -> InfoPlist {
        var infoPlist: [String: InfoPlist.Value] = [
            "CFBundleShortVersionString": "1.0",
            "CFBundleVersion": "1",
            "UILaunchStoryboardName": "LaunchScreen",
            "UISupportedInterfaceOrientations" : ["UIInterfaceOrientationPortrait"],
            "UIUserInterfaceStyle":"Light",
            "UIApplicationSceneManifest" : [
                "UIApplicationSupportsMultipleScenes":true,
                "UISceneConfigurations":[
                    "UIWindowSceneSessionRoleApplication":[
                        ["UISceneConfigurationName":"Default Configuration",
                         "UISceneDelegateClassName":"$(PRODUCT_MODULE_NAME).SceneDelegate"]
                    ]
                ]
            ]
        ]


        for (key,value) in with {
            infoPlist[key] = value
        }
        return .extendingDefault(with: infoPlist)
    }

}


//Project.swift
let demoTarget = Target(name: "CardTransitionDemo",
                        platform: .iOS,
                        product: .app,
                        bundleId: "com.app" + ".CardTransition.Demo",
                        deploymentTarget: .iOS(targetVersion: "15.0", devices: .iphone),
                        //이곳을 바꿔준다 .extendingDefault(with: [:])
                        infoPlist: .sceneDefault(with: [:]),
                        sources: ["Sources/**"],
                        resources: nil,
                        dependencies: [
                            .project(target: "CardTransition", path: .relativeToRoot("Features/CardTransition")),
                            .project(target: "CommonUI",
                                     path: .relativeToRoot("Modules/CommonUI"))
                        ])
이렇게 하면 해당 타겟을 생성할때 SceneDelegate를 이용하여 시작하라는 infoPlist가 만들어진다.
그리고 나서 Demo,SwiftAnimations의 Resources에 아래 2개의 파일을 추가해준다.
이제 다시 generate를 하여 실행해보면 정상적으로 작동 되는 것을 확인 할 수 있다.
SwiftAnimations도 정상적으로 작동한다.
여기까지가 기존 프로젝트에 Tuist 도입하기 끝이다. 앱이 굉장히 작기도 하고 SPM, cocoaPod, carthage같은 외부 의존성 툴도 쓰지 않아서 처음 시작하시는 분들에게 굉장히 좋은 예시가 아닐까 생각이 된다.
Tuist에 대한 정보 자체는 많이 안 다룰지 몰라도 처음 부터 시작하고 익숙해지는 것에 초첨을 맞춰 글을 써보았는데 큰 도움이 될지는 모르겠다.
다음글은 Tuist를 아주 살짝 더 juicy하게 사용하기 위한 글이다.
'iOS' 카테고리의 다른 글
| JENKINS (1) - 첫 CI 경험해보기 (0) | 2023.03.11 |
|---|---|
| Tuist(3) - 환경변수 (0) | 2023.02.13 |
| TUIST(1) - 설치,실행,기본구조 (1) | 2023.02.12 |
| MVVM(6) - ViewModel (1) | 2023.01.13 |
| MVVM(5) - Coordinator (2) | 2023.01.05 |